
In this Ranorex tutorial, we will take a more hands-on approach to set it up and run a test automation job. However, before we delve into the details, let’s take a quick look at why Ranorex is a powerful test automation tool.
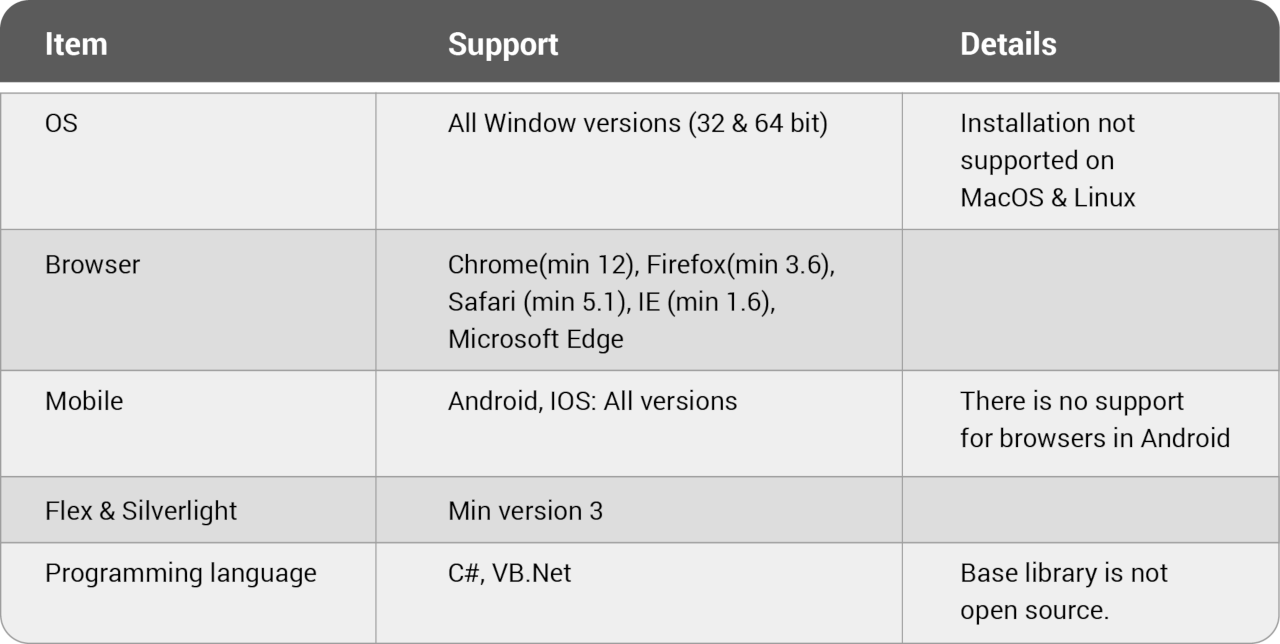
A GUI-based test automation framework, Ranorex is used for testing web-based, desktop, and mobile applications. Ranorex does not have a native scripting language to automate tests. It uses standard programming languages such as VB.NET and C#.
Why Ranorex?
A perfect end-to-end test automation tool
Many automated tests require a mix of technologies and devices. This mix may include a combination of a hybrid mobile app, a web app, and a desktop app with backend database services. Ranorex can run tests across multiple platforms & devices.
Easy for newbies but powerful for experts
Ranorex can record, and playback test runs with minimum coding. It is easy to maintain with excellent support and extensive documentation. It has same-day productivity and a fully automated IDE. While it is easy to use for beginners, this test automation tool is no slouch in the hands of experts. It supports C# & VB.net languages along with Selenium Web Driver integration in Ranorex studio 7 & above. Consequently, Ranorex also supports test execution in Selenium supported browsers. It combines data-driven testing, parameterization & reporting in a single test automation suite
Easy to maintain test suits
JUnit compatible Reports can easily integrate with the CI process (Jenkin) & ALM tools. Ranorex also supports command line support (CLI) for remote test execution and contains an enhanced WPF plug-in to recognize objects.
Typical Ranorex uses as a test automation tool
- Unit testing
- Integration Testing
- System Testing
- Regression Tests
- Smoke Test
- GUI testing
- Test stable features
- High-risk features
- Data-driven test
- Load test
- Cross-browser/device test
- Application Installation Testing
Hands-on with Ranorex
Ranorex provides a thorough user guide and has extensive documentation to help easily understand tool and features. However, in this Ranorex tutorial, we have identified a few convenient ways to get any user started with the basics in minimal time.
Starting Ranorex
-
- Start a new project wizard where user can select application type (desktop/web/mobile/any)
- Provide a solution name and location. In additional settings, you can change development language (C# / VBNet)
- Next step is to select Application under Test (AUT). In its running state, AUT can be found in the running application option. If AUT is dormant the application is available in its installed path.
- In select recording mode, we have three modes.
- Focus on a single application
- Multiple applications (add more processes as whitelisted)
- No focus applied (all processes are whitelisted)
- Start developing the test suite
Readiness of project
-
- If required, Add supported libraries .dll /NuGet packages to “References”
- Create a folder structure to accommodate upcoming changes
Test Data Source
-
- Ranorex Studio supports four different types of data sources: Simple, CSV, Excel, and SQL data tables
- These sources can be used to initialize project variables, global variables, and readiness of test data by creating a model map with the source data table
The data source supports adding of rows, columns, and values at runtime. As a result, this reflects in the project during execution.
Repository (repo)
-
- UI elements save in the repo in a tree-like structure
- Ranorex Spy adds more UI elements as and when required and we can create a folder structure to segregate these as needed
- Each repository item has its path, which follows the Ranorex xpath
- Three types of files generated while creating a repo – a repository file – “.rxrep,” a code file -”.cs” and an image hosting file – “.rximg”
- Any repository can be added/updated/deleted and cleaned as and when required
- Variables created in repo can be used to generate or complete the xpath of an element
- We can rename UI elements as per convenience

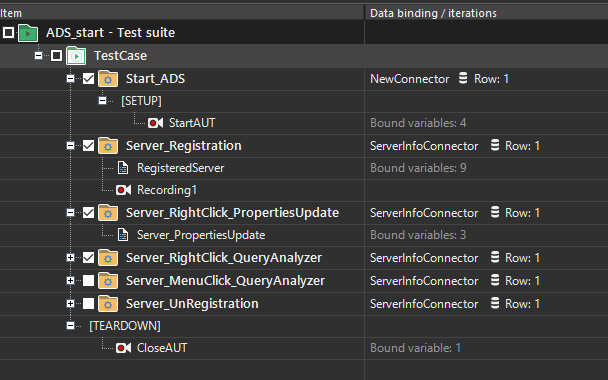
Test Suite
We can build, organize, and run tests in Ranorex Studio. Test runs save as “.rstst” extension file.
- SetUp/TearDown Region
- The setup region will always be placed at the beginning of an item and the teardown region at the end.
- Execution Region
- Test Case – A Test Case is a structure item that represents the primary function of your module
- Smart Folders – A Smart folder is just an “envelope” with a few intelligent tools for data binding and iteration count. In addition, you can use also use smart folders for loops and conditions.
- Recording Modules – These enable recording of actions
- Code modules – contains actions in the program
- Module Group (logical/imaginary grouping of code modules)
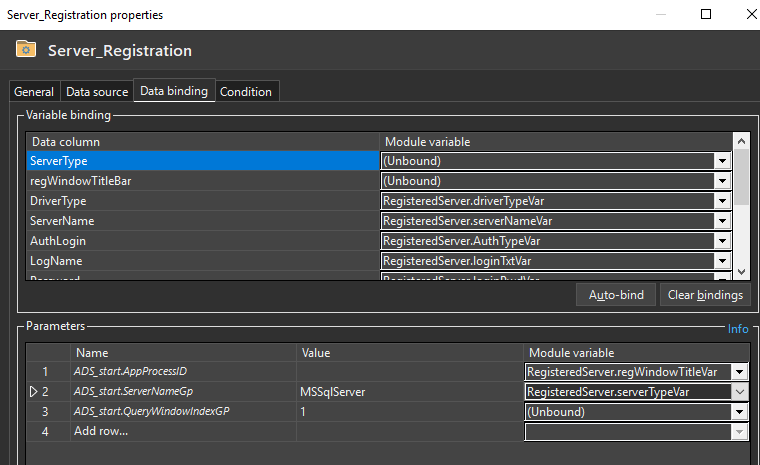
Variables/Parameters
-
- Global Parameters are created in the test suite to pass values to different test cases
- Code module variables are used during actual logic execution in the preferred language (C#/VB.Net)
- Repository variables replace a certain part of an item’s RanoreXPath, the defining attribute with a variable e.g. {/form[@processname=’datastudio’]/?/?/menuitem[@text=$RegisterServer]}
- $RegisterServer – is repo variable holding the actual value.
Data Binding
-
- As a result, once variables exist, we can map variables to the data source
We hope this Ranorex tutorial was useful. If you have any queries, please tweet to us and let us know! Here are a few past blogs that discuss other test automation tools and frameworks.